It's time to get back on the brewing horse. This is actually the first time I've really brewed for myself since my wedding. As such, and out of laziness, I decided to do something I haven't done for a while: brew with malt extract, and brew an IPA. I don't really care for IPA's for the most part. There are just so many of them, and most seem to fail to strike that perfect balance of flavors. However, when the weather gets cold and the nights come early, I find myself craving something intensely bitter. So here I am, a couple months late. It will do, though.
Recipe:
6 pounds Gold LME
1.5 pound Gold DME
.75 pound Belgian Carapils
.5 pound Caravienne
1.25 Light Munich
1 oz Simcoe @ 60
1 oz amarillo @ 5
1 oz Cascade @ 3
1 oz Zeus @ 0
1 oz Centennial @ 0
1 oz amarillo dry hop
1 oz zeus dry hop
Safale US-05
1.060
IBU 50
As usual, in an effort to make things easier, the short brew day was full of ridiculous mistakes. Half way though, the batteries in my scale decided to die (or the scale is dead, I'm not sure on that just yet), dropped my thermometer in a kettle full of boiling wort, and discovered that I had no lid for my fermenting bucket. I've been brewing for close to 5 years. Good grief.
I also realized after planning my recipe that the bittering hops I was using were 3 years old, while all the others were at least a full year old. My impromptu solution to the lack of bucket lid was to do a traditional open fermentation. Fermenting this way is supposed to really enhance the yeast esters and get a bit more of that British character that the US-05 yeast originally had. I suspect this will now be much more of a British-y pale ale than the bitter American IPA I was hoping for. I think that's just fine with me.
 |
| Hm, how do I take pictures like this, again? |
 |
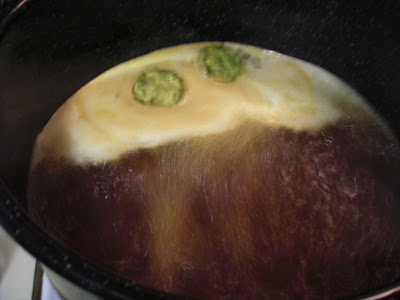
| Ah that's it: with the flash. Some pretty amazing hot break is apparent here. I have yet to see anything like that in a wort made from all grain brewing. |
 |
| I let the wort drain from the steeping malts with a colander while I begin the boil |
 |
| Oldies but goodies |
 |
| Remember hop plugs? Me neither. This is the one of 2 packs I've ever owned. I'd like to use them more, though. |
 |
| Smile! |
 |
| 1.060 on the nose. Darker color than expected. Hopefully it will lighten some. |
 |
| Impromptu open-ish fermenter |
 |
| The guts. That's some half-dissolved dry yeast on the top there. |
 |
| Day 2. Foam starting to form |
 |
| Day 3. Braun krausen and fermentation in full effect. |
 |
| Day 4. Krausen continues |
 |
| Day 5. You can see the krausen just starting to subside. This is when I chose to rack into secondary |
Open fermenting was very interesting. You really have to have some confidence in your ability to keep equipment clean and sanitized, but there is also a feeling of recklessness: it's just so foreign to have a fermenting beer exposed, you have no airlock to rely on as a guide for fermentation progress. Meanwhile, monitoring the progress of the beer is even more important with this method of fermentation since racking needs to be done in a timely manner. No safety net in the event you get lazy about transferring. All in all it was an interesting experience. I plan to conduct many more open fermentations and I'd like to get a pipeline of beers so I can top-crop and reuse fresh yeast from one fermenter to another. If the samples of this beer that I tried are indicative of what the finished beer will taste like, there will be many more open-fermentations to come. Even right from the fermenter, the samples were clean, estery, fruity and very well rounded. I honestly could have had an entire pint right from the fermenter.


Fascinating stuff. If I'm ever brave enough to step beyond merely sampling the results of other peoples' sweat, blood and toil - I'll be sure to re-read this before that step is taken. Great site, by the way, I'll be following from here on.
ReplyDeleteThanks, man. Much appreciated.
ReplyDeleteAnd you should give it a try some time. It's not a terrible amount of work. Cheers
Are you doing open fermentation mainly to crop yeast or are you getting any other benefits from it?
ReplyDeleteJorge, I have mostly done open fermentation to see what sort of flavor benefits you can get. It does make cropping yeast very easy, but it's sort of a hassle to re-use cropped yeast unless you use it right away.
DeleteI have noticed a subtle difference in flavor that certain yeast strains give you. It seems to increase the esters and general character of the yeast and also sort of round them out as well, IMO.